Relative Layout
Relative Layout enables you to specify how child views are positioned relative to each other. The position of each view can be specified as relative to sibling elements or relative to the parent.
Important attributed for Relative Layout:
Important attributed for Relative Layout:
Attribute
|
Description
|
android:id
|
This
is the ID which uniquely identifies the layout.
|
android:gravity
|
This specifies how
an object should position its content, on both X and Y axis. Possible values
are top, bottom, left, right, center, center_horizontal, center_vertical etc.
|
android:ignoreGravity
|
This
indicates what view should not be affected by gravity.
|
By Relative Layout, you can align two elements by right border, or make one below another, centered in the screen, centeref left, and so on. Bydefault, all the child views are drawn at the top-left of the layout. So must define the positionof each view using the various layout parameters such as android:layout_above, android:layout_below, android:layout_alignTop, android:layout_alignBottom, android:layout_alignLeft, android:layout_alignRight and so on..
For example, following is the content of activity_main.xml containing RelativeLayout
<?xml version="1.0" encoding="utf-8"?>
<RelativeLayout xmlns:android="http://schemas.android.com/apk/res/android"
android:id="@+id/RelativeLayout1"
android:layout_width="match_parent"
android:layout_height="match_parent"
android:orientation="vertical" >
<EditText
android:id="@+id/editText1"
android:layout_width="wrap_content"
android:layout_height="wrap_content"
android:layout_alignParentTop="true"
android:layout_centerHorizontal="true"
android:layout_marginTop="17dp"
android:ems="10"
android:hint="Enter name:" />
<Button
android:id="@+id/button1"
android:layout_width="wrap_content"
android:layout_height="wrap_content"
android:layout_alignLeft="@+id/editText1"
android:layout_centerVertical="true"
android:layout_marginLeft="50dp"
android:text="Button" />
<TextView
android:id="@+id/textView1"
android:layout_width="wrap_content"
android:layout_height="wrap_content"
android:layout_alignParentLeft="true"
android:layout_below="@+id/editText1"
android:layout_marginLeft="22dp"
android:layout_marginTop="31dp"
android:text="TextView" />
<TextView
android:id="@+id/textView2"
android:layout_width="wrap_content"
android:layout_height="wrap_content"
android:layout_alignBaseline="@+id/textView1"
android:layout_alignBottom="@+id/textView1"
android:layout_alignRight="@+id/editText1"
android:text="TextView" />
<TextView
android:id="@+id/textView3"
android:layout_width="wrap_content"
android:layout_height="wrap_content"
android:layout_above="@+id/button1"
android:layout_alignRight="@+id/textView2"
android:layout_marginBottom="36dp"
android:layout_marginRight="14dp"
android:text="This is example of Relative Layout" />
</RelativeLayout>
Write following in your MainActivity's onCreate()
SimpleDateFormat dateFormat = new SimpleDateFormat("dd-MMMM-yyyy");
Date date = new Date();
String nowDate = dateFormat.format(date);
TextView dateView = (TextView) findViewById(R.id.textView1);
dateView.setText(nowDate);
SimpleDateFormat timeFormat = new SimpleDateFormat("hh:mm");
String nowTime = timeFormat.format(date);
TextView timeView = (TextView) findViewById(R.id.textView2);
timeView.setText(nowTime);
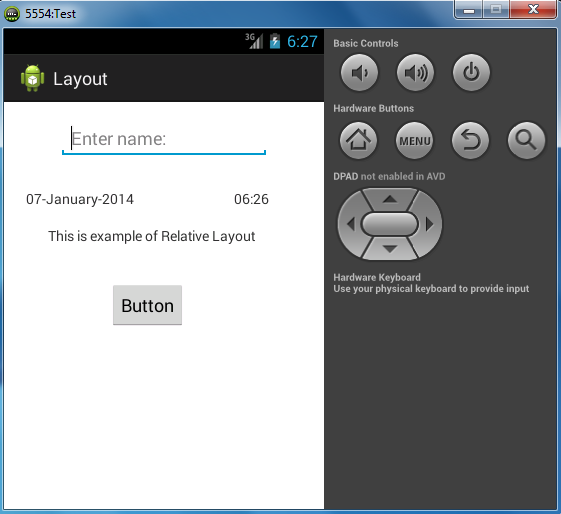
Output


Comments
Post a Comment